I wasn’t sure whether to post this or not as it’s not specifically amateur radio – But there’s a small amount of electronics involved so I figured it might be of interest.
A few days ago while Susan and I were out, I received a text from my son saying “I thought you’d like to know that the wifi isn’t working”. What this actually meant was that our home internet connection had gone down. I recently changed my ISP and had been warned that for the first couple of weeks, there might be an occasional interruption to the service. I know the router should automatically connect but sometimes that doesn’t happen.
I spoke to David and quickly determined that this is what had happened but that the router hadn’t automatically reconnected. All he had to do was switch it off and back on again and it sprung back into life. This got me thinking that perhaps this could be a good use for a Raspberry Pi as a watchdog.
It didn’t take much investigation to find some basic Python code to check for the presence of an internet connection so I grabbed that and then looked into the hardware. I’ve not played with the GPIO before but it all looked pretty straightforward. I didn’t have a suitable relay so decided to test this with just an LED playing the part of the relay so I could see if it worked.

First version of the Raspberry Pi internet watchdog
The idea is that if the Raspberry Pi Zero W detects the internet has failed, it will trigger a relay and drop power to the router for a few seconds. This first version worked perfectly and I tested it by pulling the internet connection from the back of the router. After a couple of minutes, the LED flashed. I was very happy with the way this worked and so I ordered a relay.
I wanted things to be a little more sophisticated though and started delving into the code. I’ve only just started learning Python so this was a nice educational exercise for me. It wasn’t long before I got things as I wanted. At regular intervals the Raspberry Pi checks to make sure there’s a good internet connection and if not, it drops power to the router for ten seconds, brings it back up again and then pauses to allow the router to reboot and reconnect before checking again.
The relay I’d ordered turned up and I was able to set it up and prove everything working – Once again, it’s on breadboard and you can see the green ‘OK’ LED along with the red ‘fault’ LED, although that’s disconnected and the relay is in circuit showing that power is passing through.

Raspberry Pi internet watchdog being tested
I made sure to use the normally closed contact on the relay so by default it isn’t energised, it will only activate if there’s a failure so this means I can reboot the Raspberry Pi without killing my internet connection. However there was a problem – Each time I restarted the Pi, it would click the relay and it took me a while to work out what was happening. It turned out that my Python script was starting before the WiFi had initialised and connected to my network. The script was seeing that as an internet error, going into a fail state and triggering the relay. I resolved that by adding a delay to the cron command which started the script.
I decided to use an official Pi Zero case which has a hole in the top for the camera and to repurpose the hole for the green LED. Sadly the hole was far too large for a 5mm LED so I picked up some 8mm LEDs. Of course, the 8mm LED was too large for the hole!

Raspberry Pi Zero W case and 8mm LED
It didn’t take much to enlarge the hole slightly so the LED would fit and before long it was glued in place.

8mm green LED in the Raspberry Pi Zero W case
While the glue was drying, I built the rest of the watchdog. I actually used a different Raspberry Pi Zero W to the original one I had been testing with as I didn’t need the entire GPIO header, just needed to solder a few wires straight onto the board. Here you can see the Pi mounted in the case with the wires for the relay feeding in through the bottom and soldered onto the board.

Raspberry Pi Zero W in the case along with the relay
When the glue had gone off, I wired the LED to the GPIO pins and fitted it all together for final testing.

Finished Raspberry Pi Zero W internet watchdog
After this it was a simple job to integrate it into my setup. My router has a standard DC power connector on the back so rather than destroy the manufacturer supplied power brick, I grabbed one of my many power cables, cut the positive wire, fed it through the relay, connected it all up and switched it on.
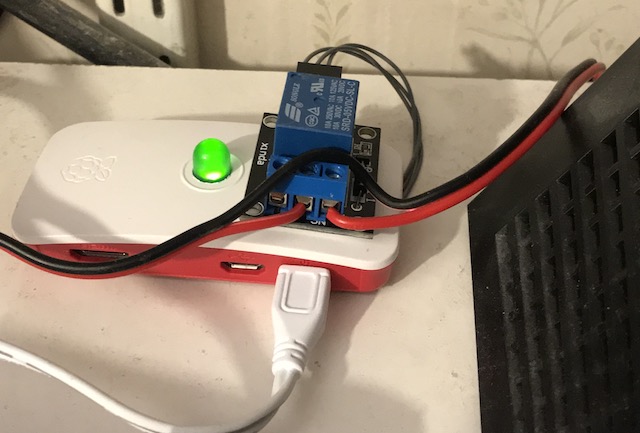
Raspberry Pi watchdog timer all set up and working
You can see I managed to catch it as it flashed the ‘OK’ signal.
The first time I started everything up with the router connected was a good test as it proved everything. The Pi started before the internet had initialised so it saw a fault condition and rebooted the router, then paused itself for four minutes to allow the router to restart and the internet to connect. Everything worked perfectly.
I consider this the perfect use for a Raspberry Pi – Think of something for it to do, find a way to do it, tweak as required and then get it working.
This entire project took just three days to complete. It was conceived on Wednesday afternoon and by Saturday afternoon it was fully implemented and working!