Note: this entire process was tested and re-validated on the 8th February 2026 using a Raspberry Pi 4, the ‘recommended’ version of Raspberry Pi OS and HamClock 4.22.
I appreciate that the last post here was about the HamClock and I said I wouldn’t be providing a guide to building one but I’ve been asked by a few people if I can write some instructions, showing what’s needed from start to end so I’ve decided to do it.
This is a long guide because it’s so detailed but it’s actually very straightforward to follow. Once you’ve installed HamClock, it will take you through the setup and then some suggestions to make changes to the default configuration.
If you’ve already got HamClock installed, or you have it as part of a pre-built system such as the Inovato Quadra, click here to go straight to the post-install setup and configuration section.
What you need
You may have most of this stuff already.
A Raspberry Pi. You can use any Raspberry Pi for a HamClock. For this guide, I’m using a Raspberry Pi Zero W (with an external ethernet adapter). I know it’s going to be a bit slow during the setup process but this will prove that it will work on the most basic model. A Raspberry Pi 5 is overkill and to a lesser extent, so is a Pi 4. A Pi 3B+ is ideal but any Pi you have kicking around will work.
A micro SD card. I like SanDisk SD cards, they seem pretty reliable. An 8 Gb card will suffice but you’ll struggle to buy those nowadays. At the time of writing, you can get a pack of two 32 Gb SD cards from Amazon for under a tenner.
A PSU for the Pi. I like to use the official Raspberry Pi PSUs.
A display. You can use a HamClock with the official Raspberry Pi touchscreen but I find the resolution far too low to be usable. You can build HamClock at 800×480, 1600×960 and 3200×1920 resolutions so pick a display that will give you a decent size and resolution. I had an old Dell P2210 22″ monitor which I made space for in the shack and it runs very nicely at 1600×960. You may find you already have an old monitor that you can repurpose for your HamClock. You’ll also need the appropriate cables and adapters to connect your Pi to your monitor.
Optional – Case, heatsinks, etc. This is really up to you. You could fix the Pi to the back of the monitor so it won’t need a case but depending on the model, you might want a heatsink. A Pi Zero doesn’t need one.
Preparing the SD card
Download the Raspberry Pi Imager from here and install it. When you run it, this is what you’ll get.

Click CHOOSE DEVICE and pick your Raspberry Pi model. Make sure to select the correct one.
Then click CHOOSE OS and you are generally going to be picking the top option. You want a full port including the Raspberry Pi Desktop. Basically pick the one that says (Recommended) at the end.
NOTE.. The HamClock installer does not natively support Raspberry Pi OS ‘Trixie’. Below, I include two additional commands to modify it to work with Trixie.
Then clock CHOOSE STORAGE and select your SD card:

Click Next and then enter your hostname (this is the name of the Pi, I’ll call it HamClock):

Click Next and complete the Localisation page:

Click Next and then enter your username. You can put what you like in here, but make sure you remember it. I like using ‘pi’ as the username but it’s up to you. It’s important you remember this username and password as you’ll need them later:

Click Next and then enter your WiFi network details if you’re using WiFi. If you’re going to be using Ethernet to connect to your Pi, then you can leave this blank:

Click Next and you’ll get the SSH authentication page. I always access my Pis using SSH and (initially) a password so I enable this:

Click Next and you’ll get the ‘Write image’ page with a summary of your choices. Confirm they’re all correct and then click the Write button.
You’ll get a warning screen pop up telling you that you’re about to ERASE all the data on the SD card you have selected. Check to make sure the right device is selected and click the big red button ‘I UNDERSTAND, ERASE AND WRITE’
You will be prompted to enter your password, do this and then the SD card will be written. Depending on the speed of your internet (it has to download an image) and your SD card, this will take a few minutes.

When the write completes, remove the SD card from your computer, click FINISH and close the Raspberry Pi Imager.

Booting the Pi for the first time and installing updates
Put the SD card in your Raspberry Pi, connect a keyboard, mouse, and display to the Pi and plug it in.
Depending on the model of the Pi, it will take some time to boot as it goes through all its own initial startup processes. The nice thing is that you’ll be able to see it go through this procedure and reboot multiple times. When it’s done, you’ll see the Raspberry Pi desktop which will be something like this.

The first thing to do is updates. Click on the terminal icon (4th from left in the top corner) and type the following commands into the box which appears.
sudo apt update && sudo apt upgrade -yThis will take some time to complete because it’s updating everything on the Pi. Because we’re using the Raspberry Pi OS with the desktop, there’s a lot more to update than if you had just the lite installation. While it’s doing the updates, the screen will almost certainly go black due to the screensaver. If this happens, just move the mouse slightly. When it has finished and you’re back at the prompt, reboot your Pi.
sudo reboot nowInstall HamClock
Once you have successfully rebooted, open the terminal again. We’ll use the provided script to install HamClock.
Enter the following commands.
Note – the curl command is curl -O. It’s a capital letter O, not a zero (0). Ideally copy and paste these commands to make sure you enter them correctly. If you get even one character wrong, it will fail.
The two ‘sed’ commands are the ones which allow the installer to work with Raspberry Pi OS ‘Trixie’. In fact, you only need the first one, the second is just the results of the OS check. If you’re using Bullseye or Bookworm you don’t need to enter the ‘sed’ commands.
cd

curl -O https://www.clearskyinstitute.com/ham/HamClock/install-hc-rpi

chmod u+x install-hc-rpi

sed -i "s/'bullseye|bookworm'/'bullseye|bookworm|trixie'/" install-hc-rpi

sed -i 's/Raspberry Pi OS bullseye or bookworm\./Raspberry Pi OS bullseye, bookworm or trixie./' install-hc-rpi

./install-hc-rpi
Click y to proceed and hit enter.

This will appear to hang on Installing required helper packages but it’s just slow to complete.

After the helper packages install, you will be asked if you want to build for web access only. If you are building this on a Raspberry Pi with a monitor attached, you should answer n to this question.

When this has completed, it will ask what resolution you want to use. You’ll notice here that it has detected I have a display that’s 1680×1050 and so it offers me the available resolutions. You should always pick the highest resolution that your monitor can support and in most cases this will mean 1600×960. If you have your Pi connected to a 4K display then you’ll also be offered 2400×1440 and 3200×1920 so again, pick the best one.

HamClock will now build and give you a handy progress indicator. Now is a good time to grab a cup of tea or coffee and perhaps a digestive biscuit to dunk while you wait for this stage to complete. On older Pis, this will take a long time and may appear to have hung. Be patient and wait, it will complete.

Answer ‘y’ to the question about installing a HamClock desktop icon.
Answer ‘y’ to the question about the User Guide (an online version is always available here).

Answer ‘y’ to the question about auto starting HamClock.

Assuming it’s all worked correctly, you’ll have a message saying that HamClock installation is complete.

Reboot your Raspberry Pi again.
sudo reboot nowWhen the Pi reboots, it will automatically start HamClock and because this is the first time it’s been opened, it will drop into the setup routine.
Setup Page 1
*** Note that this part of the guide has been updated to HamClock 4.22. Please also refer to the official HamClock documentation which is updated after every release. ***
Enter your callsign in the Call section and your grid in the Grid section. The Lat and Lng will update automatically. Your callsign should be your valid amateur radio callsign, if you want to show something different on the main screen, you can use the Title option.
Once you are done, click on < Page 1 > in the top right corner to switch to the next page.

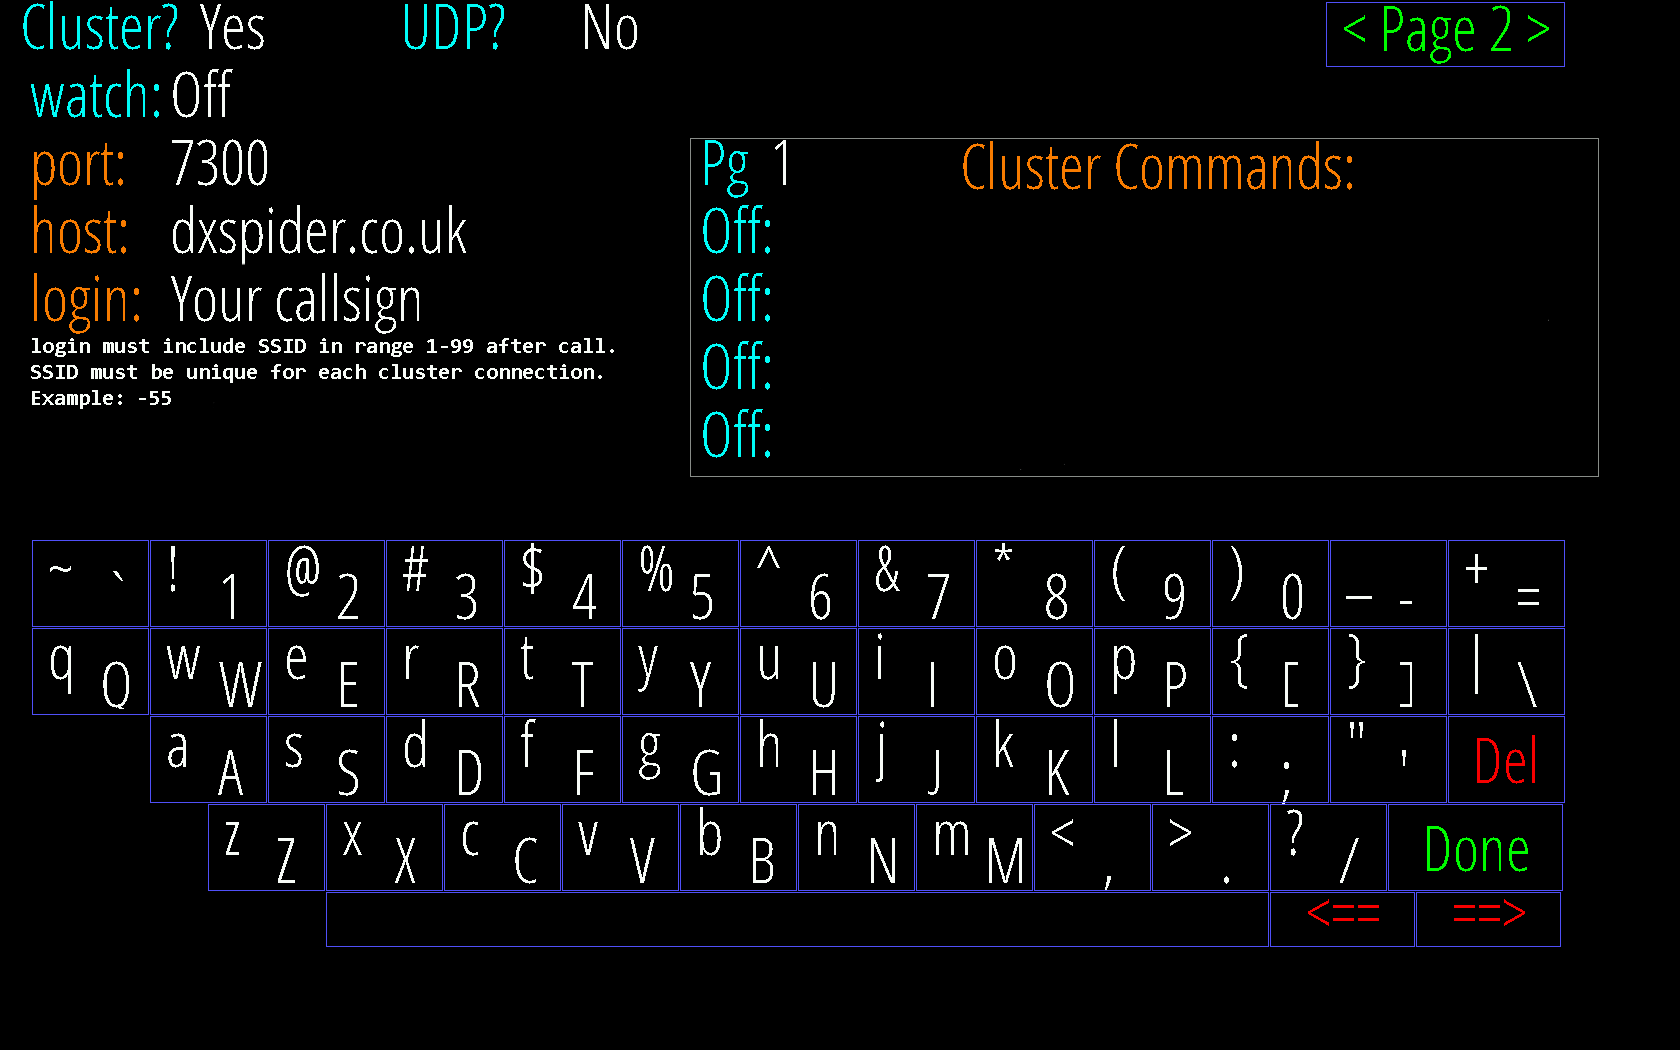
Setup Page 2
By default, Cluster will be set to No.

Tap the space bar to change this to Yes and complete Page 2 as below.
Note that as from Version 4.17, you will be forced to add an SSID as per the note below the ‘login’ field, this is to ensure that if you log on to the DX Cluster network with any other software that there won’t be any clashes between them. If you have updated from a previous version of HamClock, this will be automatically added for you as -55.
The port and host are especially important on this page, they ensure you’re connecting to the best DX Cluster node for HamClock: dxspider.co.uk port 7300. You may think that if you’re not in the UK that you shouldn’t use this cluster. You should, it’s optimised for HamClock.
Once you are done, click on < Page 2 > in the top right corner to switch to the next page.
Setup Page 3
There is nothing to change on Setup Page 3 for a basic setup. If you need to change any of these options, please refer to the official instructions.
Click on < Page 3 > in the top right corner to switch to the next page.
Setup Page 4
You may want to change the Map center lng setting from 0E to centralise the map on your own QTH. This is entirely up to you.
Once you are done, click on < Page 4 > in the top right corner to switch to the next page.

Setup Page 5
There are a number of things to consider changing on Setup Page 5. The ones I suggest are.
Auto SpcWx Map? – Change this to Yes. This is great for spotting propagation changes. If the DRAP value goes above 25 MHz, the DRAP map will be added to the rotation and removed again if it drops below 15 MHz. If the chance of aurora goes above 50%, the aurora map will be added to the rotation and removed when it drops below 25%.
Units? – You can choose Imperial, Metric or British.
Log Usage? – Change this to Opt-In. This helps the developer.
Full scrn direct? – Change this to Yes. This ensures that HamClock will completely fill your screen.
Auto upgrade? – *** New in HamClock 4.16 *** This allows you to set HamClock to automatically update itself when a new version is released. You can set it to 03:00, 12:00, 21:00 or off, these times are DE times, ie local to you. It is highly recommended to enable this option so you always have the latest version of HamClock.
Note that the line thickness / no line option has been removed from Page 5 and added to Page 6 where it is much more granular and can be configured per band.
Once you are done, click on < Page 5 > in the top right corner to switch to the next page.

Setup Page 6
This is where you can set custom colours in HamClock. The default set of colours were designed to be high contrast but I use PSKReporter a lot and HamClock comes with a set of colours to match them. You can click on ‘pskreporter’ at the bottom so that HamClock uses the same colours. If you click on ‘default’, it sets the colours back to the original HamClock set. You can also customise the colours to your own preferences and save them in either set A or B.
The page was completely changed in HamClock V4.10 to allow much more granular control of the line for each band.
Once you are done, click on < Page 6 > in the top right corner to switch to the next page.

Setup Page 7
Page 7 is for automatically switching off the display. I don’t have any of these set.
Once you are done, click on the Done button in the bottom right corner to save all your settings and start HamClock properly.
Configuring the panels
HamClock will load with a default set of panels and you will see various propagation beacons popping on and off on the map.

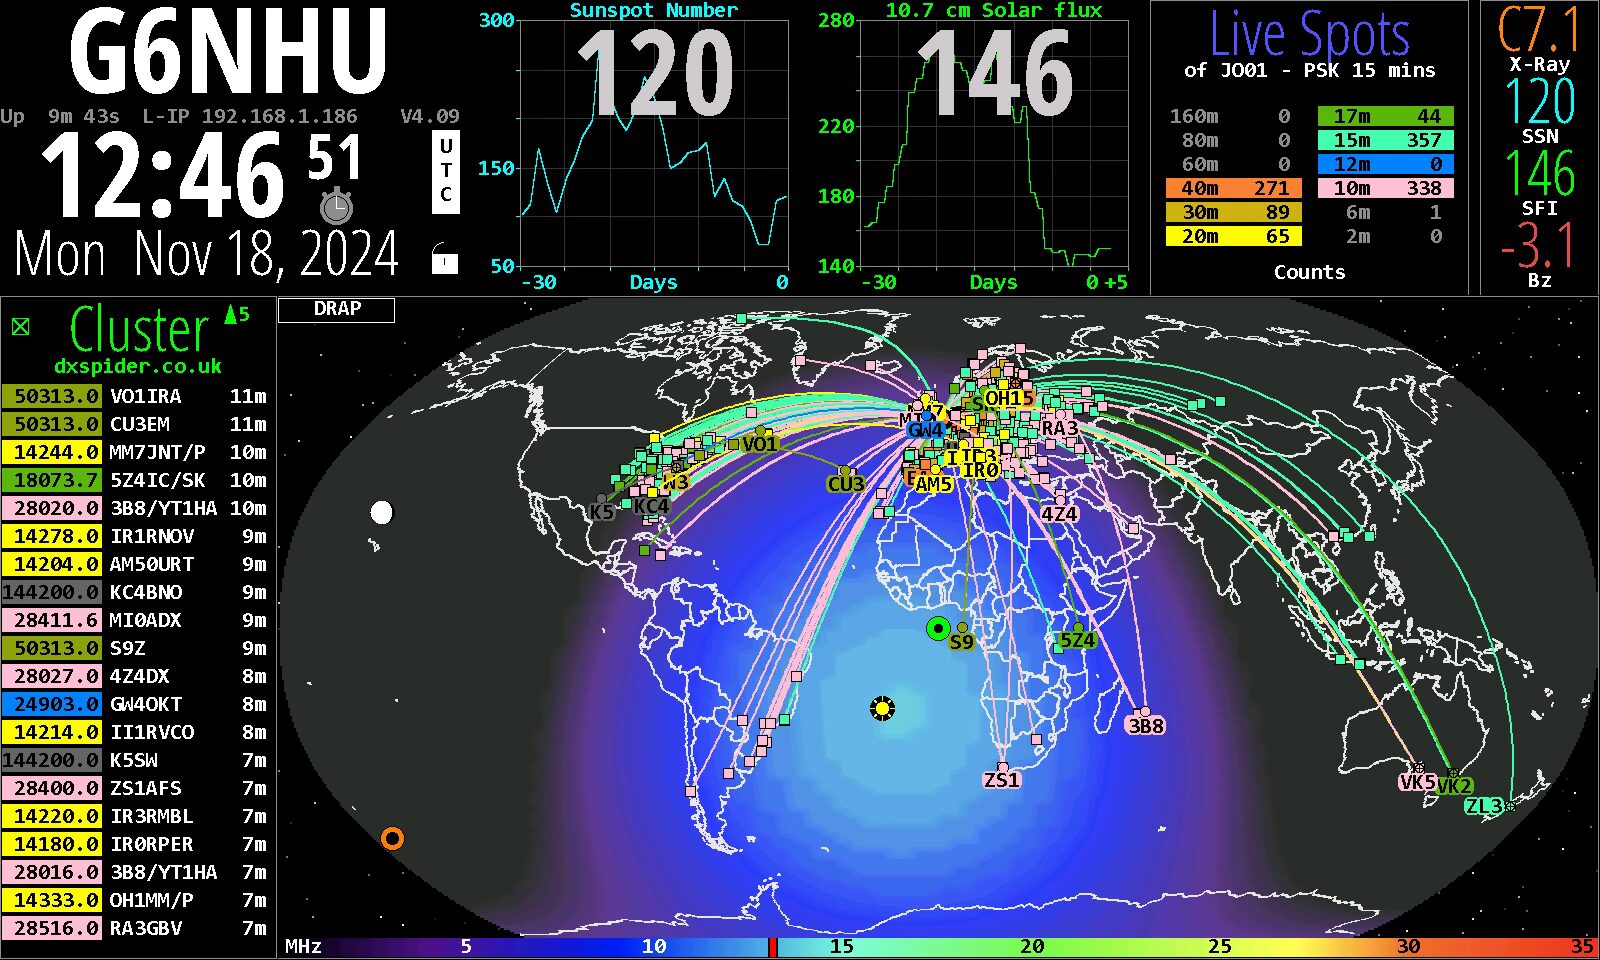
Setting a large DX Cluster panel
The DX Cluster is important to me, far more important than the DE: and DX panels and as from version 3.07, HamClock is able to replace both those panels with a single large DX Cluster panel.
Before you do this, make sure you don’t have a DX Cluster pane visible at the top because you can only have it enabled in one place at the same time. If you do have a DX Cluster pane at the top, change it to something else or it won’t be shown as an option here.
Click within the DE text in the top left corner of the DE panel and a popup box will appear.
Select Data Panes, make sure DX Cluster is selected below and click the Ok button at the bottom.

The DE and DX panels will be replaced by a single DX panel, spots will appear below and will also be plotted on the map. The panel shows the frequency, the callsign and how many minutes have passed since the spot was received. If the number is shown as an h, it means the spot was received more than an hour ago.

Space Weather panel
By default, the top right panel shows beacon information but I think that putting space weather there is more important. Click the NCDXF text and in the popup box, deselect NCDXF, select Spc Wx and click the Ok button.

The Live Spots panel
As well as DX Cluster spots, I like to have spots from PSKReporter plotted on my map as well and to do that, I’m going to use the panel that defaults to VOACAP DE-DX.
Click anywhere in the VOACAP DE-DX text, select Live Spots, deselect VOACAP and click the Ok button.

This panel itself now needs some configuring.
Click within the panel itself and the config screen will pop up. This is how I have it configured.
Top row is set to PSK so I’m seeing PSK Reporter spots.
Second row is set to ‘of DE’, so it will plots spots of the DE location.
Third row is set to Grid so it plots spots of stations transmitting from my grid square.
Fourth row is set to Count so I can see how many stations are reporting.
Firth row is set to 15 min so it only plots stations from the last fifteen minutes. The map can get very busy, this helps keep it in check.
At the bottom is a list of bands. I select the bands I’m interested in monitoring.
Once you have configured this panel how you want it, click the Ok button at the bottom.

The Live Spots panel is perhaps the most useful out of all of the panels to show you what’s actually happening on the bands at the moment. When you have it configured as above, the panel will show you how many transmissions from your grid square are being heard on each band. With it set to 15 minutes, it’s effectively real time so you can see where you could be able to work on each band. With this configuration, it’s using PSK Reporter as the source and as there always people using FT8, it’s a very good indicator. The reception reports are plotted on the map with little squares on the end and the best DX on each band is indicated by a little circle with a cross and the callsign prefix.
For example, this zoomed in picture shows the furthest anyone in my grid square has been heard on 10m is this PY2 in Brazil and there have also been other reception reports from my square in the same country but not quite so far away.

Setting the final two panels
There are two other panels, by default they are set to X-Ray and SDO (images from the Solar Dynamics Observatory satellite). I have pertinent information displayed in the Space WX panel and I’m not especially interested in the SDO images so I’ve changed these to be a permanent display of Sunspot Number and Solar Flux respectively. You can pick anything you like from the many display options that HamClock has available by clicking within the panel and choosing what you want.

Changing how your callsign is displayed
To change the way your callsign is displayed in the top left corner, click to the right side of your callsign to change the background colour and the left side to change your callsign colour. I prefer a solid colour on a black background.
Changing the map type
By default, the HamClock map shows countries which is pretty but not very useful for amateur radio purposes. Click in the top left corner of the map where it says Countries and you’ll get a popup with all the available options. I’m not going to go through them all here, the best way to see how they all work and to decide what’s most useful to you is to work your way through them and pick whatever you like the best.
My personal preference is to set the Style to be DRAP, the Grid to None and the Projection to Robinson. I don’t have the RSS feed enabled and I have Night and Cities turned off.
Note that you can select multiple Styles and HamClock will rotate them in the same way other panes are rotated. The rotation time is called Map rotation? and is configured on setup Page 5.

With all these options set, this is how my HamClock looks.
DX Cluster filtering
By default, you’ll receive all DX Cluster spots, for all bands and as reported by everyone. You may find this is too much and you want to tidy it up. You can do this by entering basic filter commands in setup Page 2.
To re-enter setup, click the padlock icon, select Restart HamClock and click Ok. Click Ok again when prompted and HamClock will restart. Click anywhere on the screen within ten seconds to enter setup and click < Page 1 > in the top right corner to move to the next setup page.
On the right side of the screen, there are multiple lines for Cluster Commands. You can use standard DX Cluster filter commands in these lines to restrict what you see. These commands are beyond the scope of this guide, please see the Filtering Primer by W3BG here or you can add a comment to this entry and I’ll try and help you.
Filtering out all data spots, including FT8 and FT4 from the DX Cluster feed
Click on the padlock and select ‘Restart HamClock’ and click Ok, click Ok again when prompted and when it restarts, click anywhere to go into the setup and go to Page 2.
Configure it as per the screenshot below.
The first line removes an existing filters, the second line adds the filter for all data modes and the third line checks the info text for FT8 and FT4 which will help pick up any DXpeditions using non standard frequencies. Be very careful to type these commands exactly as shown.
Note that (at time of writing) this filter will only work properly if you connect to dxspider.co.uk.

Updating HamClock
HamClock is updated regularly and the current release notes can always be seen here. When an update is available, the version number in the top left panel will change to red. I recommend that you always update HamClock as soon as possible so if you see this version number is red, click on it and follow the prompts to update.
From HamClock version 4.16, there is an Auto Upgrade option on setup page 5. It is highly recommended to enable this to ensure the latest version is automatically downloaded and installed.
Conclusion
This guide takes you through the process of setting up a HamClock from scratch, starting with writing the Raspberry Pi operating system to an SD card through to having a fully working HamClock. I’m only scratching the surface of the things which can be displayed on your HamClock so please take the time to fully read the instructions and decide what’s important to you.
A HamClock is a very useful addition to any amateur radio shack, it’s easy to build, you probably already have pretty much everything you already need and the nice thing is that a Raspberry Pi uses so little power that you can leave it running all the time and simply switch the screen on when you go into the shack. If you’re interested in HF, space weather or propagation then a HamClock can only improve your amateur radio experience.
What next?
Go and read this page which shows you how to use the new On The Air pane and this page which shows you some of the new features that have been added since this guide was written.
Make a donation
Over the years quite a few people have asked about donating to support my blog and DX Cluster. I’ve always said no, but with expenses rising I’ve decided it’s time to add a donation button, which you’ll find on the right-hand side and at the bottom of each post.
This page was last updated on the 9th February 2026
Help so Much Tnx Chris de N3WER
Inovato.com offers a complete computer with HanClock (and more programs!) pre-installed. For only US$50
Hey Clint,
Thanks for that – Yes they do, and it looks absolutely ideal. I don’t know enough about it to compare it to a Raspberry Pi though. To anyone who has one, you may find the setup guide here useful, especially taking care on Setup page 2 to use dxspider.co.uk port 7300 for your cluster connection because it has various tweaks to make it more HamClock friendly.
If you already have a Raspberry Pi kicking around not doing anything, there’s no need to buy an Inovato and if it’s all about cost, remember that a Pi Zero 2 W, PSU and SD card are still cheaper, especially when you add in tax, shipping and possibly vat/import duty if you’re buying an Inovato outside the USA.
73 Keith.
And definitely THANK YOU for the HamClock setup suggestions!
They have stopped shipping to overseas (US and UK only now) cost of postage was a killer.
Thank you for the guide Keith been a great help setting up Hamclock.
I had it installed on a PI 400 with a 24inch monitor but your guide really helped in
setting up the panels.
73 Mike G1HWY
Hi Mike,
Thanks for the feedback, that’s exactly what I wanted to achieve. There are many guides showing how to install HamClock but not much that goes into the configuration of the panels so that’s what I was keen to cover.
I genuinely think that the HamClock is one of the most useful tools a radio amateur can have in their shack.
73 Keith.
I also found your guide help full ! I am still trying to figure out how to get the live HF bands/lines on the map& their call sign’s to show up on my ham clock. they was their when i first turned it on and added my call (kq4hrt) But the battery’s in my controller was dying & some how it got changed/turned off & i did not see/or catch it in time and so i have spent 3-4 days trying to figure it out I have read ever guide i can find trying to find out what i need to know But i don’t even know what that feature is even called Needless to say its ben kicking my Butt ..lol. Thanks For The Help !
Hi Jamie,
It sounds like you’ve removed the DX Cluster and/or Live Spots panel from your HamClock.
First, check if the version number (just below your callsign) is in red. If so, click it and follow the prompts to update.
Then, when your HamClock restarts, follow my guide and enable the DX Cluster and Live Spots panels.
Is there a way to configure/manage the RSS feeds?
Nope, have a look at FAQ #20 on this page.
How do you change your call sign?
Hey Dan, good question.
Click the padlock, select Restart HamClock and click OK. Click Yes when it asks if you’re sure.
HamClock will restart. Click anywhere on the screen to enter setup and your callsign is the very first thing on Page 1, you can change it there.
While you’re in setup. click the > in the top right corner where it says Page 1 and go forward to Page 2. If you have Cluster set to Yes, also change your callsign in the login field so it matches your callsign in Page 1. It would be sensible to add an SSID as well, -1 or -2, whatever.
While you’re in that page, make sure the port is set to 7300 and the host set to dxspider.co.uk
When you’re finished, click Done in the bottom right corner and HamClock will restart.
Hope that helps.
73 Keith.
Thank You, Keith very helpful. DAN
Is there a way to add a satellite to the list of those that can be displayed? (We’ll be launching our own satellite in a year or two and want to be able to add it to the list.)
Is there a way to turn off the banner at the bottom of the screen and simply expand the size of the map? Alternatively, is there a way to put our own text in the box?
Hi David,
I’m sure Elwood will be happy to add any additional satellites providing the Keps are available. You’re best contacting him via the official HamClock website.
By the banner, do you mean the RSS feed? If so, click in the top left corner of the map where it shows your current map name, make sure that RSS towards the bottom is not selected and click OK.
73 Keith
Hi Keith, I am really in need of help setting up the filters in Hamclock for your cluster. I have tried the examples from the link you mention above but nothing seems to work. I seem to get all the spots no matter what I put in the filter. I am only interested in spots for my itu zone – 49. I have tried accept/spot 0 call_itu 49 and nothing is filtered. What am I doing wrong?
I am going crazy – all sorted! Delete my comments please.
Hello,
hamclock on my raspi 4b shows over 100% CPU-usage, which makes the other processes on the pi slow down extremly. Same if i try to run it on the desktop linux PC with lots of power.
Is there a way to configure hamclock in a way to use less system ressources?
Thanx
I would never expect HamClock to use over 100% CPU, I’ve found whatever I run it on takes around 50-60% on one core leaving plenty for everything else.
But yes, you can configure it to use less.
FAQ #33 on the HamClock site:
“33. Why is the CPU usage so high on the Pi and other UNIX platforms?
This is a consequence of HamClock being originally written for the ESP8266 embedded processor. I wrote a porting layer that allows me to use the same application code on the Pi. This saves me a lot of effort but since the ESP8266 code is fundamentally an infinite loop, the result is the UNIX program runs all the time also.
It’s not usually a big deal in practice but if it bothers you, use the hamclock -t command line argument to set the desired CPU percentage. For example, to limit cpu usage to about 50%, run hamclock as follows:
hamclock -t 50
Note that lower limits will result in more sluggish performance.”
I’ve done some testing of this on various different systems and found that -t 30 is about the sweet spot, I wouldn’t want to go any lower than that.
Thank you, sorry for not seeing this topic in the FAQ-page. I’m gonna try to tinker with the parameter and settings. 73
No need to apologise, there are a lot of FAQs there 🙂
I think you’ll be happy with -t 30, it reduces the load nicely and isn’t sluggish at all when you’re using the HamClock.
Sorry to bother again, just started the hamclock-web with t-setting to 40.
Linux showed a beautiful 38.5% usage.
After selecting POTA-stations on the screen as one of the nice gadgets, the CPU usage rocketed up to 90% and remained on somewhat around 80%.
Didn’t return to a value lower than 40.
Even after deactivating the OnTheAir-option the usage remained on 70+
There’s nothing else I can suggest really, I’m not the software developer so I can’t offer any more advice than he does on the official HamClock site, sorry.
Initial steps didn’t work when commands were copy/pasted from a text document into the terminal. Hamclock setup won’t run. ‘LS’ shows the download in the terminal. The GUI hides the download (for some reason). The file name is appended with a ~ The dot-slash install command throws an HTML error.
Hello Jason,
Without trying to sound dismissive, this is almost certainly a typing error. You’re mistyping something because these commands have been used by literally hundreds of people and tested by me again just a couple of weeks ago. To be sure, I’ve just downloaded the installer again on my main HamClock Pi.
But let’s try and help you fix this.
Trying to break it down, if the ./install-hc-rpi command is throwing an html error, it means that the download hasn’t completed successfully and what’s probably been downloaded is a 404 webpage error.
curl -O https://www.clearskyinstitute.com/ham/HamClock/install-hc-rpi
Remember that the -O is a capital letter O and not a zero. The rest of the command is case sensitive so must be typed exactly as shown.
Give it another go please. If you still can’t get it to work, please email me a screenshot showing the error using my email address that’s on qrz.
73 Keith.
/edit – This issue was resolved, Jason was downloading the HamClock installer into a folder he didn’t seem to have full permissions to.
FYI, Michael from Inovato sent out an email a few days ago, he is unwell and is shutting down Inovato in a couple of weeks. His email contained a link to this webpage, and is how I found my way here.
Hi Conrad,
Yes, I had that from Michael as well, and I’ve been in conversation with him. It’s such a shame.
HamClock is not developed by Inovato and development continues. I’ll try and keep this guide up to date as HamClock updates are rolled out.
73 Keith
Just wanted to say thanks. This guide is excellent.
Excellent job, Keith!
Btw, added fourth line on spider config
rej/spot 2 info RTTY
I hope it will work…
73! LY5DX
Hi,
Yes, that will work.
You could add it to line three and add PSK as well 🙂
rej/spot 1 info ft8 or info ft4 or info rtty or info psk
Keith, thank you so much for this guide. While I had HamClock running your set up instructions were just what I needed. I especially enjoyed the filtering tips! Now for some reason when I upgraded to the latest version I don’t see how to select my BM-280 to display the temp, humidity etc in the shack. I guess I’ll reach out to Elwood and see if I’m missing something. Thanks again, great work! 73 Alan, W3AL
Hoping someone can help me, doing a new install on a Raspberry Pi and at the following setup command I’m getting no response from the server, as if the Clearsky web page isn’t working? The web site doesn’t come up in a browser either, has something changed?
cd
curl -O https://www.clearskyinstitute.com/ham/HamClock/install-hc-rpi
No problem with either the download command or the website here. Could you have something on your network blocking the connection?
Thanks for replying, I think so but I don’t know where to start. Nothing has changed and the wifi setup is the same as it was when it was working. I can access the web site via my cell phone but not on wifi. Oh where to begin! I’ll see what I can discover, might start with rebooting everything!
OK, here we go again. I’ve been running Inovato for about two years now with no problems. Yesterday it once again upgraded the software and it seems like it reset everything and now I have lost all of my signal tracks/DX paths (station to station lines, both solid and dashed) and I cannot get them back. I’ve turned on and off everything I can think of, click every menu item. I believe I need to activate or deactivate and still nothing. Can somebody do a screen grab of their settings just so I can try to figure out what’s going wrong.
I only ever hear about this losing configuration thing when running HamClock on an Inovato. I think you need to raise this with Michael on their support forums. But a useful tip, when you’ve got a configuration you like, save it through the padlock / configurations option so you can restore it later if you need to.
https://forum.inovato.com/support-919087
Thank you. I wasn’t really sure where to raise this question. it’s been so long since I originally set it up. I can’t remember how I had it configured and I had padlock everything but something about this last program update wiped even anything I had saved out so basically I had to start from the very beginning. Anyways much appreciated
You could just follow my guide above from the stage where you start HamClock as it shows you how to set up the panes with live spots and the dxcluster.
I also strongly recommend you have a look at the user guide:
https://www.clearskyinstitute.com/ham/HamClock/HamClockKey.pdf
Yes, of course before I started bothering anybody about this the first thing I did was read the downloadable instruction manuals from Ham clock, but I couldn’t find any mention of these lines and what turn them on or turn them off. Your guide seems like a good one and I might have to go back to the basics and start from scratch….Once again.
No need to go right back to the start, follow from here: https://qso365.co.uk/2024/05/how-to-set-up-a-hamclock-for-your-shack/#setup
????
Well that was a great help. I followed your instructions right from the section after setting up raspberry Pi and now everything seems to be working properly. Thank you again
Excellent, glad you got it sorted.
Hi Keith. I’m relatively new to Ham Clock. I’m running the Inovato version. I’ve followed your steps to display the DX Cluster on the left side of the display. I also like to display Live Spots for my call sign’s FT8 signals and the signal tracks. Is there a way to disable the signal tracks from the DX Cluster? They interfere with one another.
Thanks for the great work.
Rich – N0FXQ
Hey Rich,
Yup, setup page 6, just deselect the ‘On’ boxes.
Hello,
Thank you for the guide, really useful. I installed with success HamClock on W11 via WSL. This worked perfectly for a few days, and then suddenly stopped working. As I couldn’t find why, I reinstalled WSL/Linux and HamClock, which did work again for some days. What happens is that that counter on the application stops counting, and HamClock is stuck.
In the log file I see “Daemon: could not connect to Windows Agent: could not get address: could not read agent port file “/mnt/c/Users/koenv/.ubuntupro/.address”: open /mnt/c/User
s/koenv/.ubuntupro/.address: no such file or directory”, not sure if they even ever existed.
It is like when I use the application every day, it keeps on working, however when I didn’t use it for some time, no way t get it running again. Already countered this problem?
Kind regards – Koen
Well, this really drives me nuts, today application starts without a problem … never mind.
Just did the full install on a new Raspberry Pi 500. I had to downgrade the OS from Trixie to Bookworm first. This was my first time using a Pi and it all went as described.
Thanks so much!
73
David
G0PBS
Oh, just found one issue. Despite following the instructions, it doesn’t run on startup. Not a big deal, particularly while I explore what else I can do with the PI, but it would be good to know the solution. Thanks
I will not have a screen so would want to access and view via the ip / url, what would the port number be ?
http://xxx.xxx.xxx.xxx:8081/live.html
Where xxx.xxx.xxx.xxx is the IP of your HamClock.