Last Updated on June 16, 2020 by g6nhu
** This is now outdated, I recommend the pre-built image from here rather than following these instructions. I can not support this method any more **
I originally bought a Raspberry Pi back in October 2012 but as I didn’t have a specific purpose in mind for it, I quickly sold it again. A few months ago I decided to play around with a Pi again and bought the latest model. Since then I’ve found a few uses including an ADS-B aircraft tracker and an adblocker for my whole house. In fact I’ve become quite fond of these little devices and now have a small fleet of them!
I’ve been looking at other things I can do and I tried a NOAA weather satellite receiver which, although it worked wasn’t particularly great with the aerial I used and I really didn’t need to put another antenna up outside. I also looked at a 137MHz ship tracker but the less said about that, the better.
One thing I thought might be interesting to try was a receive only APRS iGate using a Raspberry Pi and cheap RTL-SDR dongle so I’ve set one up and it’s working really well.
I found everything I needed in two guides which are both very well written although there’s more in them than you need so I’m going to reproduce exactly what I did here.
Please note – I am not claiming originality for these instructions, I’m simply following what’s already available out there on the internet. My two source documents are Raspberry Pi SDR IGate and Raspberry Pi Packet TNC. I thoroughly recommend you download them both as they go into a lot more detail than just listing the commands. It’s also worth grabbing the full Dire Wolf user guide.
If you want a pre-built image for this setup which only requires you to edit a maximum of three files, see my more recent blog entry here.
You will need a Raspberry Pi and an SDR dongle. I’ve been using an RTL-SDR R820T2 RTL2832U 1PPM TCXO SMA Software Defined Radio (Dongle Only) device which is the latest model, complete with TCXO.
I have this running successfully on the smallest and cheapest Raspberry Pi currently available – The Raspberry Pi Zero. I bought my Zero from Pimoroni along with a three port USB/Ethernet interface which ironically costs more than double the price of the actual Raspberry Pi Zero. Typically the CPU usage sits around 30-35% on the Zero.
First download install your operating system. I used the full latest version of Raspbian Jessie from here and the installation guide from here. Because we’re going to be doing this install entirely by command line, before you plug the card into your Raspberry Pi, you’ll need to create a file called ‘ssh’ on the card to enable remote access. In my case, on my Mac I simply right clicked on the mounted SD card, selected Services/New Terminal at Folder and then at the prompt typed the command
sudo touch ssh
I was then asked for my password, this created the file and I moved the SD card into my Raspberry Pi.
You will need to know what IP address your Raspberry Pi has on the network. I do this by looking at my router and checking what devices have connected and then set up a DHCP reservation so each particular Raspberry Pi I own will always have the same address each time it reboots.
The next thing to do is some basic housekeeping which I do on all new installations. Open up a terminal/dos prompt or whatever client software you’re going to use to connect to the Raspberry Pi and log in. In my case, the Raspberry Pi is on 192.168.1.144 so I use the command
ssh pi@192.168.1.144
The default password is raspberry, one of the first things to do is change that via the Raspberry Pi configuration utility which you run now using sudo raspi-config
This is what you see when you open the config utility.
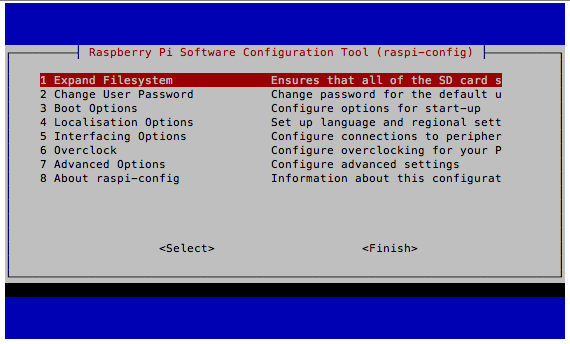
The Raspberry Pi software configuration tool
Select option 1, select OK and you’ll be returned to the screen above.
Select option 2 and following the prompts, change your password.
Select option 3 and first choose Desktop / CLI and then Desktop Autologin. This is important because without this, the iGate will not be able to start automatically when you reboot the Raspberry Pi.
Select option 4 and configure your Timezone and Wi-fi country. I generally don’t bother with Locale and Keyboard Layout.
Select option 7 and then choose Hostname. Give your Raspberry Pi a name other than the default.
Once all these changes are done, use the tab key to move down to <Finish> and hit enter. You’ll be prompted to reboot the Raspberry Pi.
The next thing to do is to make sure the Raspberry Pi software is fully up to date. Issue the following commands:
sudo apt-get update
sudo apt-get dist-upgrade
Depending on which model Raspberry Pi you have and how old the image is, this may take some time to complete.
Then remove the Wolfram engine using the following three commands:
sudo apt-get purge wolfram-engine
sudo apt-get clean
sudo apt-get autoremove
Once this is all complete, reboot the Raspberry Pi and you’re ready for to start the actual installation.
sudo reboot now
Remove pulseaudio and reboot.
sudo apt-get remove --purge pulseaudio
sudo apt-get autoremove
rm -rf /home/pi/.pulse
sudo reboot now
Log back in and install the sound library.
sudo apt-get install libasound2-dev
Download the Dire Wolf source code.
cd ~
git clone https://www.github.com/wb2osz/direwolf
Compile and install Dire Wolf.
cd ~/direwolf
make
sudo make install
make install-rpi
make install-conf
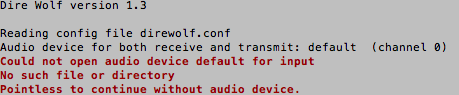
Test
direwolf
This will fail with the following error because you haven’t configured any audio devices.
Now it’s time to install the software for the RTL-SDR dongle.
sudo apt-get update
sudo apt-get install cmake build-essential libusb-1.0-0-dev
cd ~
git clone git://git.osmocom.org/rtl-sdr.git
cd rtl-sdr
mkdir build
cd build
cmake ../ -DINSTALL_UDEV_RULES=ON -DDETACH_KERNEL_DRIVER=ON
make
sudo make install
sudo ldconfig
Now you need to complete the final configuration. Use the APRS Passcode Generator at Magicbug to get your own passcode.
cd ~
sudo nano sdr.conf
On line eight, change the xxx to your callsign and required SSID. I use -10 as my SSID so this line reads MYCALL G6NHU-10
In the section below, edit the line starting with IGSERVER to be the correct one for your region. I’m in Europe so my line reads IGSERVER euro.aprs2.net
Scroll further down and you’ll find a line that starts with IGLOGIN. Change the xxx to be the same as the callsign you entered above (including SSID) and then change the numbers 123456 to the passcode you obtained from the APRS Passcode Generator.
You now need to add an extra line at the bottom of the file.
PBEACON sendto=IG delay=0:30 every=15:00 symbol="igate" overlay=R lat=xx.xxxxxx long=yyy.yyyyyy COMMENT="zz iGate | DireWolf 1.3 on RPi+RTL-SDR"
Note that although it’s spanned over two lines above, you should enter this as one continual line in your file. Replace xx.xxxxxx with your latitude, yyy.yyyyyy with your longitude and zz with your callsign (including SSID). Be aware that there is a space between the lat and long values.
Reboot.
sudo reboot now
If you don’t reboot, you’re going to get errors.
It’s now time to test this.
Enter the following command (144.800 is the APRS frequency in the UK, change as required).
rtl_fm -f 144.80M - | direwolf -c sdr.conf -r 24000 -D 1 -
If all is well, you should see something like this.

Initial test of the Raspberry Pi and RTL-SDR Dongle APRS RX only iGate
You can see that it’s started up successfully, connected to euro.aprs2.net and I’ve already received an APRS packet from M0SDJ-9 relayed through MB7UH. The magenta text shows that my own beacon has been sent to the internet and I can check that by searching for G6NHU-10 on aprs.fi.
If you’re using a Mac and connecting to your Raspberry Pi via the terminal you may notice the screen flashes badly. You can fix this easily and quickly by going into the terminal Preferences/Profiles and make sure the box “Allow blinking text” is not ticked.
The last thing to do is to set everything to start automatically when you restart the Raspberry Pi. To do this, edit dw-start.sh
cd ~
sudo nano dw-start.sh
Scroll down and look for this line
![]()
Edit it to remove the hash at the start and change the frequency to whatever is appropriate in your area. In the UK, APRS is on 144.800 MHz so my line looks like this
![]()
Save the file and then run the following command to make the script executable.
sudo chmod +x dw-start.sh
Finally, add a line to cron which will run once a minute to check whether Dire Wolf is running and if not, it will restart it.
crontab -e
If this is the first time you’ve edited the crontab, you’ll get a prompt asking which editor to use – Just hit enter to select nano as the default.
Scroll down to the bottom and paste the following line.
* * * * * /home/pi/dw-start.sh >/dev/null 2>&1
Reboot your Raspberry Pi and once it’s restarted, it will automatically connect to the APRS network and operate as a receive only iGate. Nothing will be echoed to the display while it’s running like this so you can check the status on aprs.fi.
I hope this guide is straightforward enough to follow – It looks more complicated than it actually is, it’s really quite simple just to follow all the steps through.
I have previously had a bash at Pi APRS
http://www.m1hog.com/projects/rtl_sdr_projects/rtl-sdr.html
But I found the dongle rather deaf and frequency unstable. I had plans to try and improve it, but that never happened…
I also experimented with bandwidth options in rtl_fm which seemed to reduce noise, as we only need a spot frequency.
Seeing your walk through and options for a much better £20 dongle I am going to give this another go! Thanks!
Hi Nicolas,
The newer dongles with the 820T2 chipset seem a lot better, the TCXO versions are much more stable and I’ve not had to adjust the frequency of mine at all. I’m receiving stations over fifty miles away using a collinear at about 30′ AGL so it doesn’t seem deaf either.
I’ll be interested to know how you get on if you try this with a newer dongle.
73 Keith.
Just been installing… Your instructions worked fine. I wanted to do it from scratch again as it reminds me what is where, and any other issues I hit along the way get understood. I used the Jess-Lite image as a basis I only had to enable SSH(!) as this is now disabled by default and install Git as this is not included in the Lite install. The shortcuts to the desktop failed – as there is no desktop!
All seems fine. Started with an old dongle but will order a new one. Hopefully the beacon for M3NQG (my brothers station) will show up on aprs.fi shortly
Thanks!
I’m pleased it’s working for you but that does raise an interesting question – If Jessie Lite doesn’t come with a desktop, how are you able to set the startup options in raspi-config to select Desktop Autologin? Without that, the script to start on reboot doesn’t work – Or at least it doesn’t on the full Jessie install.
With my downloadable image, I’ve removed a lot of stuff to make extra space so that there’s plenty of space left, even on a 4Gb card.
That is the issue I have just had… Jessie Lite is probably just making things hard for myself, as this Pi is only going to be “single task”. I have set auto login for console.
You are absolutely right the startup script relies on X being installed. If not the script cannot start a window to run the direwolf task in.
I amended the startup script
#
# Adjust for your particular situation: gnome-terminal, xterm, etc.
#
bash -c ‘rtl_fm -f 144.80M – | direwolf -c sdr.conf -r 24000 -D 1 -‘
I doubt this is optimal, but it does at least beacon.
All shows up on APRS.fi Next step is to see if I can get a packet through with my current RTL and local Kenwood D7!
The smartest way to do this, and what I’ve done on mine (and it seems to work just fine) was to adjust the script to be:
screen -dm -S direwolf bash -c ‘rtl_fm -f 144.80M – | direwolf -c sdr.conf -r 24000 -D 1 -‘
It requires screen to be installed on the system, but then it’ll automatically start it in a session that you can attach to later (via screen -r direwolf) to view its behavior, but doesn’t require any of that display stuff.
I too am running this on Jessie Lite (avoiding GUI for security reasons), and plan on putting this in my closet completely headless when it’s up & running (hopefully), but I am having problems, as it won’t start up nor continue running without being SSH’d into and maintained. Does anyone have a work around for this. From reading, I see that it either needs the GUI installed, or a screen (for CLI mode) present; is in not possible for complete headless operation?
Thanks in advance all! Station @ KM4PWE-10
You don’t need to use Jessie Lite to run headless, I’m doing this on a Pi Zero which has never had a monitor, mouse or keyboard connected to it. The process does rely on having the Pi configured to boot the GUI and login on startup but that doesn’t stop you running completely headless.
73 Keith.
I adjusted the rtl_fm config with -p38 then sent test packets from my D7 which where plotted. Now I just need a better RTL dongle and get everything setup back at it’s old home!
Do you know what the “Official” iGate symbol is?
Excellent glad you’ve got that all working.
Regarding the symbol, what I’ve set in the config file is correct for an RX only iGate.
http://www.aprs.org/symbols/symbolsX.txt
http://aprs.org/symbols/symbols-new.txt
Thanks! It will be properly up and running soon.
NooElec-NESDR-SMArt Dongle arrived to today. Now all setup and running as M3NQG-10
Thanks!
Great news Nicolas.
I ordered another NooElec-NESDR-SMArt Dongle took awhile to arrive, but yesterday I setup M1HOG-10 to further test the dongle/antenna options. All configured fine.
It seems using the RTL_FM software you can reduce the bandwidth to 12k – which I guess might be some improvement and set the gain manually?
I wonder if you had any further thoughts on how to optimise the Packet RX?
Thanks!
Hi Nicolas,
Nope, I can’t say I have thought any more about it – I’m very happy as it is.
Hi,
Well, if I find any further improvements I will let you know. Always keen to improve the station..
Thanks again for the write up!
Nicolas
Keith, thanks for a nice clear guide. Thanks to your page I set this up within a couple of minutes on a BeagleBone Black that I was already using for RTL-SDR duties (all I had to do was install and configure direwolf, missing out the “make install-rpi” line). Great stuff, 73
You’re very welcome, Andy.
73 Keith.
Seems to work mostly but I am getting a ‘Connect to Igate … failed.’
I do see that it tries to send but is not being received happily at the other end apparently.
BTW it’s not a connectivity issue because I can ping the server and get a response with low latency.
I’m almost there. I took the device into town and was able to connect in a coffee shop that has a decent bandwidth. It works! But, it doesn’t work at home.
Question: is there a specific port I need to open on my router?
Thanks.
Oh grief – what a simple solution after all this.
My firewall was blocking noam.qprs2.net!
All fixed now – thanks for the help.
73
Grover K7TP
Hi Grover,
I’ve been away most of this week so haven’t had a chance to look here. I’m really sorry I didn’t get back to you with any other suggestions but having said that, I’m really pleased you’ve found the problem and resolved it.
73 Keith.
I am getting this error which I don’t understand:
Reading config file sdr.conf
Audio input device for receive: stdin (channel 0)
Audio out device for transmit: null (channel 0)
Found 1 device(s):
Channel 0: 1200 baud, AFSK 1200 & 2200 Hz, E+, 24000 sample rate.
Note: PTT not configured for channel 0. (Ignore this if using VOX.)
Bind failed with error: 98
Address already in use
Some other application is probably already using port 8000.
Try using a different port number with AGWPORT in the configuration file.
Bind failed with error: 98
Address already in use
Some other application is probably already using port 8001.
Try using a different port number with KISSPORT in the configuration file.
Use -p command line option to enable KISS pseudo terminal.
0: Realtek, RTL2838UHIDIR, SN: 00000001
Grover, that looks as though you’ve already started the application, as though you’ve edited crontab and then tried to run it manually as well. It’s one or the other, not both.
Good! That part is solved – thank you.
But I still can’t connect to the tier 2 server.
Help appreciated.
This is what the pi sends to the igate noam.aprs2.net
[ig] K7TP-2>APDW13:!3913.01NR12114.02W&K7TP iGate | DireWolf 1.3 on RPi+RTL-SDR
Following this there is a long pause and then the ‘failed to connect’ series from each gate in the noam rotation.
Hi Keith,
Travelling on Internet i found your page with this very interesting project. i would like to build it!
I have a question about radio part:
Didn’t you need any pass band filter for 144 Mhz?
Thank you in advance.
73 Felice IK8WTD
Hi Felice,
I’ve not used any additional filtering on the receiver for 144MHz. I don’t know how much difference it would make because I’ve simply not tried one!
73 Keith.
Hi Keith,
please sorry if I’m making mistakes. I’m trying to write a post but I can not see it in the list! I try to send it again please don’t be angry with me.
73 Felice IK8WTD
Hi Keith
first off all let me say you Happy new year and already passed Merry Christmas 🙂
I need again your help about your system.
Some times it happen to have blocked desktop and a prompt to ask me password:
Login pi
Password ????
I tried raspberry as password ( as described on raspberry.org) but it doesn’t work. Do you changed it in your software image?
Please let me know.
Thank you in advance.
Felice IK8WTD
Hello Felice,
No – I left the password set as ‘raspberry’ but I did suggest in my instructions that you should change the password. Did you do that?
73 Keith.
Hi Keith,
thank you so much to replay so fast 🙂
I didnt change password but I really can not understand why Raspberry is blocked in this way. It seems like some one take control of it and changed something…could be possible? It is one of million of devices in the world why it have to happen to me…I use raspberry for ham purpose not for money!!!
I would suggest the best thing to do if you didn’t change the password is to reimage, ie start again. It shouldn’t take long with a fresh download.
Hi Keith,
Finally I started to build my IGate station and I would like to have some indication from you to better understand if I’m proceeding in the right way.
I decided to use your pre-built image on my raspberry and attached below I send the printout of rtl_fm command:
rtl_fm -f 144.80M – | direwolf -c sdr.conf -r 24000 -D 1 –
Part 1
Reading print out lines I made some considerations as follow:
First of all I discovered to have a RTL-SDR R820T not a R820T2 also if the dongle description I bought said that! If you read in my print screen do I’m right?
https://www.amazon.it/Radioddity-100KHz-1766MHz-0-1MHz-1-7GHz-Full-Band-Receiver/dp/B01MRFGW95/ref=sr_1_12?ie=UTF8&qid=1499432125&sr=8-12&keywords=RTL-SDR
I decided to continue using the R820T. Comparing your print screen terminal with mine I think I’m not receiving anything because in your example I can read some APRS traffic messages. At the end of my printscreen no other row was added. I thought something at audio level, so I tried to change it. As described in Direwolf manual I used, in sdr.conf file, ADEVICE plughw:1,0 but nothing happened! As you can see in my print screen it still use Audio input device for receive: stdin. Any suggestions about?
Part 2
I read on my print screen a tuned frequency which is not what we expect 145052. For this reason I made some calculations and experimented that to obtain 144800 i needed to use 144.548M. Do you thing it is possible to made other kind of variations instead to use a not real rtl_fm parameter?
Part 3
pi@aprs-igate:~ $ rtl_fm -f 144.80M -p 2 – | direwolf -c sdr.conf -r 24000 -D 1 –
Dire Wolf version 1.3
Reading config file sdr.conf
Audio input device for receive: stdin (channel 0)
Audio out device for transmit: null (channel 0)
Found 1 device(s):
Channel 0: 1200 baud, AFSK 1200 & 2200 Hz, E+, 24000 sample rate.
Note: PTT not configured for channel 0. (Ignore this if using VOX.)
Ready to accept AGW client application 0 on port 8000 …
Ready to accept KISS client application on port 8001 …
Use -p command line option to enable KISS pseudo terminal.
0: Realtek, RTL2838UHIDIR, SN: 00000001
Part 4
Using device 0: Generic RTL2832U OEM
Found Rafael Micro R820T tuner
Tuner gain set to automatic.
Tuner error set to 2 ppm.
Tuned to 145052000 Hz.
Oversampling input by: 42x.
Oversampling output by: 1x.
Buffer size: 8.13ms
Exact sample rate is: 1008000.009613 Hz
Sampling at 1008000 S/s.
Output at 24000 Hz.
Now connected to IGate server euro.aprs2.net (185.43.207.219)
Check server status here http://185.43.207.219:14501
[ig] # aprsc 2.1.4-g408ed49
[ig] # logresp IK8WTD-1 verified, server T2HUN
Part 5
Keith
I had to split my message to have it on the blog.
73 felice IK8WTD
Hi Felice,
The two different type RTL dongles work the same, there should be no problems using either a R820T or an R820T2.
You don’t need to make any change to the frequency. There’s an explanation why in the comments in either this post or the full image post as to why but please leave it at 144.800 otherwise you may well be receiving on the wrong frequency.
73 Keith.
Hi Keith,
I played with the Raspberry and RTL-SDR combination, but as a NOOB like me, I failed.. (I must have done something wrong… No Linux guy here)
Also I have a Funcube lying around, instead of an RTL-Dongle, is the Funcube also usable?
Cheers, André PE1PQX
Hi André,
You might be better off using the pre-built image as I don’t know how well these instructions will work with the latest Raspbian Stretch. Take a look at this post for the details.
There’s probably a way to do it with the Funcube dongle but I wouldn’t know where to start. I think it’s probably a bit overkill to use an expensive receiver like that though for a receive gateway
73 Keith.
Thanks Keith, I already downloaded the image file and will play with it.
The reason I mentioned the funcube is because is it an expensive receiver and has a higher quality than de RTL-SDR sticks.
I am not using it much, because I still have to get into SDR more and more often.
(I might be a little old-fashioned here, like receivers with buttons and dials a bit more.)
73′, PE1PQX
Keith,
I have managed to get your image running, only needed to change the callsigh, GPS-location and receive frequency. (showed 145.052MHz, not 144.800Mhz).
Also when I send an APRS frame from my Yaesu FT1-XD, the speed and altitide are not in metric values, but in MPH and feet. Is there any way to change is in KMH and meters respectively?
Next job for me is to build an external 2m vertical for the RTL-dongle… 😉
Thank you for a very nice guide.
I´m now running Direwolf on a Pi 1B with Raspbian Stretch, with the call SA0AZS-10.
All I had to modify was to add “-p 74” to handle the RTL-SDR:s frequency error, and then the packets showed up on my screen.
Thanks again.
73 de SA0AZS
Oh that’s excellent news – I’ve not tried it on Raspbian Stretch so I’m very happy it’s working. I might rebuild my gateway from the start just to prove to myself that the instructions are good.
73 Keith.
Hi. Thanks for taking the time to put this information together. It has been invaluable for getting this to work.
One question that someone may be able to answer. I have had the iGate up and running for over a month now. However, I never see any “Stations Heard Directly By” traffic. I just see the the Raw data from when the iGate checks in.
“2017-11-03 11:08:20 MDT: WJ0NF-10>APDW14,TCPIP*,qAC,T2BC:!3842.06NR10856.77W&WJ0NF-10 iGate | DireWolf 1.4 on RPi+RTL-SDR
Am I missing something simple here? A “Rely Traffic” setting that should be True instead of False?
APRS is all new to me. Learning as fast as I can.
Thank you. John, WJ0NF
Hi John,
If you’re not the first gateway to receive someone then you won’t be credited online as having heard it. You can test this if you have an APRS transmitter. Simply transmit from your APRS station into a dummy load so that your gateway is the only station that can hear it and you should see it shown online.
73 Keith.
Hi Keith.
Well, I don’t have an APRS transmitter yet. I was just wondering if there was some setting I was missing. Once I do get an APRS transmitter, of some kind, I will do some testing.
Thank you for taking the time to get back to me.
73 John
Hi Keith,
I am trying to run your pre-built image on a Pi Zero W, but it doesn’t seem to be working. The Direwolf window will pop up for a split second and then close back down. This also happens with another image I configured from scratch that runs fine on a Pi 3. I put that card in the Pi Zero W, and it opens and instantly closes.
Any Ideas? I would like to get this running on the Zero if possible.
Thanks
Kris Garner
Hi Kris,
Have you tried uninstalling and reinstalling Direwolf? It’s mentioned in the instructions that it might be needed when a certain error occurs but it could be worth trying anyway. I also wonder what SDR dongle you’re using. I’ve only tried it with a couple of them and it has worked perfectly on both a Zero and a Zero W.
73 Keith.
I’ll give that a try when I get a chance. It just struck me as odd that it did the same thing with a currently working build on a different SD card from the RPi 3. I tried it in another Zero and it did the same. I’ll try the reinstall.
A clean install and reconfigure of Direwolf seems to have fixed the issue. It’s working fine on the Pi Zero W now.
Thanks again,
Kris W4KMG
Hello,
I have an pi zero w with stretch image. It is all working fine if i start at command line with ” rtl-fm…..”. At desktop mode via VNC nothing happens. Crontab give me always an error after editing last line with “start.sh”. Does anyone have the same Problem? I am a beginner with linux and looking for a solution.
Thank you!
Hi Michael,
I’ve not tried this with Raspbian Stretch yet – I’ve got a spare Pi Zero W so I’ll experiment this weekend.
hello G6NHU OM.
I am a beginner about Linux.
There is a question about Compile and install Direwolf items.
” make install-rpi”
What are contents of a file of “rpi”?
Executing the command will result in make: *** [install-rpi] error.
DE JA6JLZ
From JAPAN.
I’m sorry, this method is outdated – I really can’t support this any more as it’s two years old. I suggest you download the updated pre-built image.