Last Updated on May 19, 2025 by g6nhu
I wrote my HamClock install guide about a year ago and although I’ve kept it up to date with each version that’s been released, it doesn’t specifically show the new stuff that’s been added. I wrote about the new On The Air pane here.
Configurations
HamClock now allows you to save and load configurations. This can be handy if you want to reconfigure your HamClock for different purposes, for example for a contest where you’re only interested in one band.
Click the padlock, click Configurations and then Ok.

The Manage Configurations screen will open with no configurations shown.

To save a configuration, click in the Save new box so it highlights in green and type your configuration name next to it.

Then click the Ok button to actually save the configuration. HamClock will immediately switch back to the main display.
Click the padlock, select Configurations and click Ok. The configurations screen will open and you will see your configuration is saved.

This screen is used to save, restore, update, delete or rename your configurations and you can also effectively do a ‘factory reset’ on your HamClock from here by selecting the Reset to default configuration option. When it restarts, it will be like starting for the very first time.
For the technically minded, configurations are stored in ~/.hamclock/configurations. You can copy this directory to other computers running HamClock to share your configurations.
Automatic upgrade – It is highly recommended to enable this
HamClock 4.16 added an option to automatically upgrade when a new version is released. Prior to 4.16, the upgrade process was entirely manual, requiring users to notice when the version number changed to red and then click on it to install the update. Many people missed this and ended up with an out of date HamClock. Because updates often include performance tweaks as well as fixes and new features, it is highly recommended to turn on automatic upgrading.
Click the padlock, click to Restart HamClock and click Ok. Click Ok again to confirm and then when HamClock restarts, click anywhere to enter the setup.
Click on < Page 1 > in the top right corner to go to < Page 5 >
Towards the bottom of the right column, there’s the Auto upgrade? option.

This can be set to 03:00 (3AM), 12:00 (noon), 21:00 (9PM) or Off. Assuming you have the DE time in HamClock set to your local time, these times are all local to you, they are not UTC times so you don’t have to worry about any conversions. Select the time you want and then click Done.
Note that the times are not the exact time the upgrade will happen as these will be staggered so that all HamClocks don’t update at exactly the same time. If you select 03:00, then the upgrade will happen some time between 03:00 and 04:00. If you select 12:00, the upgrade will happen some time between 12:00 and 13:00 and if you select 21:00, the upgrade will happen some time between 21:00 and 22:00. If you select Off then HamClock will not update itself and you’ll have to trigger it manually.
The new DXPeditions pane
Also added in HamClock 4.16 and enhanced in 4.17. the new DXPeditions pane is a fantastic addition to HamClock and one which will be appreciated by all DXers. It’s so easy to miss DXPeditions when they come on air and so this pane makes it very easy. It shows all current DXPeditions, plus those planned for the next month or so. Information is taken from DXNews and NG3K.
The first thing to do is to make sure you are set up on Page 2 for a dxcluster connection. You may ask why this is needed for a DXPedition pane but the reasons will become clear soon.
Click the padlock, click to Restart HamClock and click Ok. Click Ok again to confirm and then when HamClock restarts, click anywhere to enter the setup.
Click on < Page 1 > in the top right corner to go to < Page 2 >
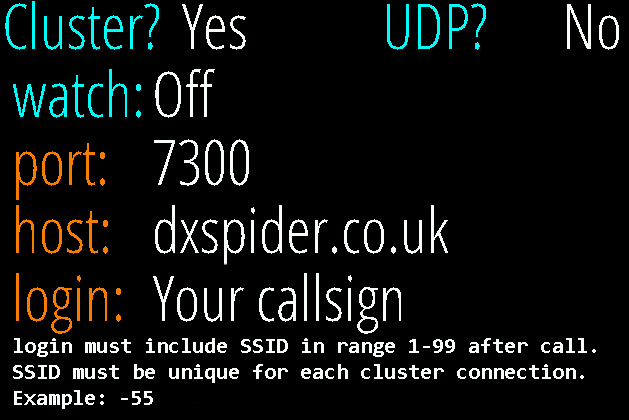
Make sure it’s set up like this. dxspider.co.uk is highly recommended as the best cluster to use with HamClock so if you have something else there, now’s the time to change it. Make sure the port is correct as well and that Your callsign has an SSID. An SSID is a hyphen (dash) symbol followed by a number between 1 and 99 as described in the note below the login field. For example, if your callsign were G6ABC, then you would put G6ABC-55, or G6ABC-1. Note that the callsign here must be the same as your callsign in Page 1 of the setup (although it doesn’t need the SSID on Page 1).
dxspider.co.uk is optimised for HamClock with various configuration tweaks to make it more HamClock friendly and just because it’s .co.uk, doesn’t mean that it’s only for UK or European users. It really is the best cluster to use with HamClock for everyone, no matter where in the world you are.
With that all filled in correctly (you are using dxspider.co.uk, right?), click Done and HamClock will restart.
The DXPeditions pane can go either along the top of your HamClock on in the left side column, replacing DE and DX. The left column is generally the best place because it’s going to show a lot of information.
Click DE and this window will appear. Select Data Panes, select DXPeditions and click Ok.

The DXPeditions pane will load and show you all current DXPeditions in green and all planned DXPeditions in black. They will also be plotted on the map as green or black squares. You can see where I’ve drawn an arrow between a couple of DXPeditions and their plotted squares.

It gets better. When you hover over a DXPedition in the list, the plot on the map is highlighted with a red circle and the info box on the map gives more details. Here you can see I’ve hovered over the Falkland Is DXPedition, the location is highlighted on the map and all the appropriate information is shown.

But wait… There’s more. Click anywhere in this area….

Select Show spotted in red, and click Ok.

HamClock will connect to the dxcluster you configured on Page 2 of the setup and any DXPeditions which have been spotted recently will be highlighted in red in the list. Also, a line will be shown on the map showing the location of the station who spotted them. The line will be coloured to indicate the band they were spotted on (as configured in setup Page 6).

But that’s still not all… If you hover over the DXPedition in the list, the plot will be highlighted as before and now the info box will show you the frequency that the station was spotted on. In this case it’s on 24.915 MHz (and from HamClock 4.18, the mode will be displayed as well).

You will also see that at the top left, there’s now a DXC indicator which shows that the connection to the dxcluster is active.
If you upload an ADIF file of your logbook to HamClock and configure it on setup Page 3, when you hover over a DXPedition, the info box that pops up will show you the bands and modes that you’ve already worked that DXCC entity on. For example, here I’ve hovered over Marcus and you can see I’ve worked it on 20m CW and RTTY and 15m CW.

There are a lot of DXPeditions and not everyone will be interested in them all. I’ve worked Curacao a lot so I can click on it, select Hide, then Ok and it will disappear from the list.

If you want to show what DXPeditions you’ve hidden, click in the area below the DXPeds text and select Show hidden in brown and click Ok.

Now you can see which DXPeditions you’ve hidden and can click them to unhide again.

As you can see, the DXPeditions pane is very powerful and can help you when you’re looking to make contact with any DXPedition that may be on air. Combined with the dxcluster connection to show what’s recently been spotted, it really is a great addition to HamClock.
Tooltips
When you’re in the HamClock setup pages, you can show a tooltip for pretty much every field with a brief description of what it does. Depending on what you’re using, either control-click, command-click or use the middle mouse button to show these.

Summary
These are just some of the new features added to HamClock recently that you may not have been aware of. Whenever HamClock is updated, the User Guide is also updated and is always available on the HamClock website or by a direct link here. The User Guide contains the most recent release notes and these are also available on the Download tab of the web site. You can also click on the version number to be shown the most recent release notes as well.
Great work. Thank you very much!